<?xml version="1.0" encoding="utf-8"?><feed xmlns="http://www.w3.org/2005/Atom" ><generator uri="https://jekyllrb.com/" version="3.10.0">Jekyll</generator><link href="https://theara-seng.github.io/feed.xml" rel="self" type="application/atom+xml" /><link href="https://theara-seng.github.io/" rel="alternate" type="text/html" /><updated>2026-03-30T07:03:37+00:00</updated><id>https://theara-seng.github.io/feed.xml</id><title type="html">Home</title><subtitle>Theara Seng</subtitle><author><name>Theara Seng</name><email>t.seng@aupp.edu.kh</email></author><entry><title type="html">Finger Count using MediaPipe</title><link href="https://theara-seng.github.io/posts/2026-01-01-Finger_count" rel="alternate" type="text/html" title="Finger Count using MediaPipe" /><published>2026-01-01T00:00:00+00:00</published><updated>2026-01-01T00:00:00+00:00</updated><id>https://theara-seng.github.io/posts/Finger_count</id><content type="html" xml:base="https://theara-seng.github.io/posts/2026-01-01-Finger_count"><![CDATA[<h1 id="️-finger-detection-and-counting-using-mediapipe">🖐️ Finger Detection and Counting using MediaPipe</h1>

<p>Real-time hand tracking and finger counting is one of the most engaging ways to introduce <strong>computer vision</strong> concepts. In this post, we will explore how to build a simple yet powerful system that detects hands and counts fingers using <strong>MediaPipe</strong> and <strong>OpenCV</strong> in Python.</p>

<p>This project demonstrates how modern AI libraries allow us to build interactive applications with minimal code while still understanding the underlying logic.</p>

<hr />

<h2 id="-what-this-project-does">🚀 What This Project Does</h2>

<p>The system uses your webcam (or IP camera) to:</p>

<ul>
  <li>Detect a human hand in real time</li>
  <li>
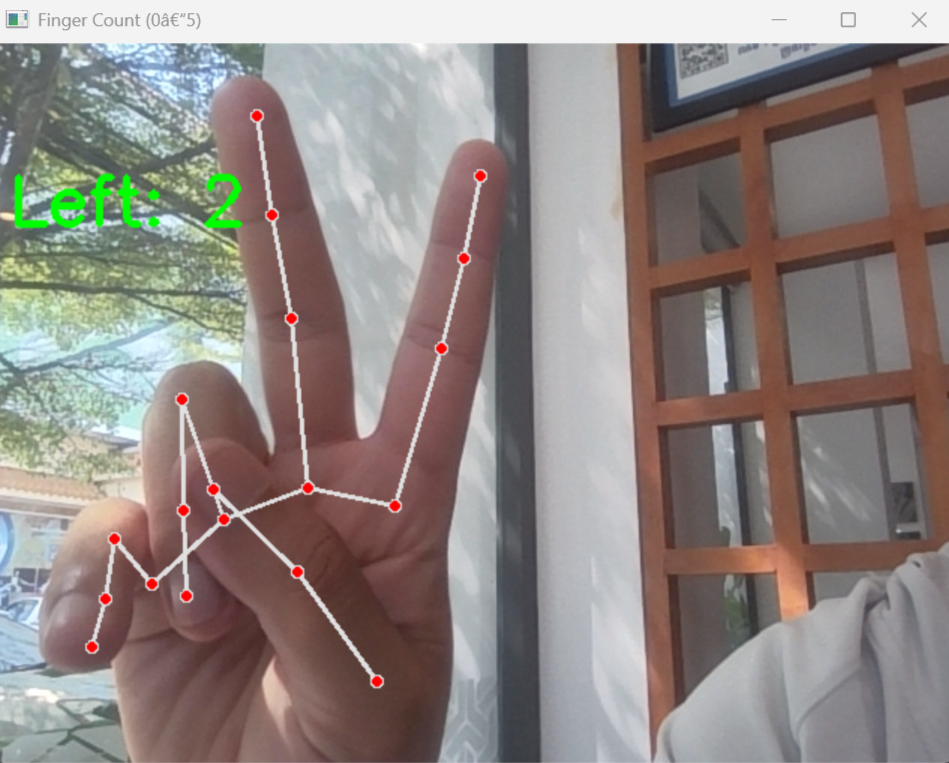
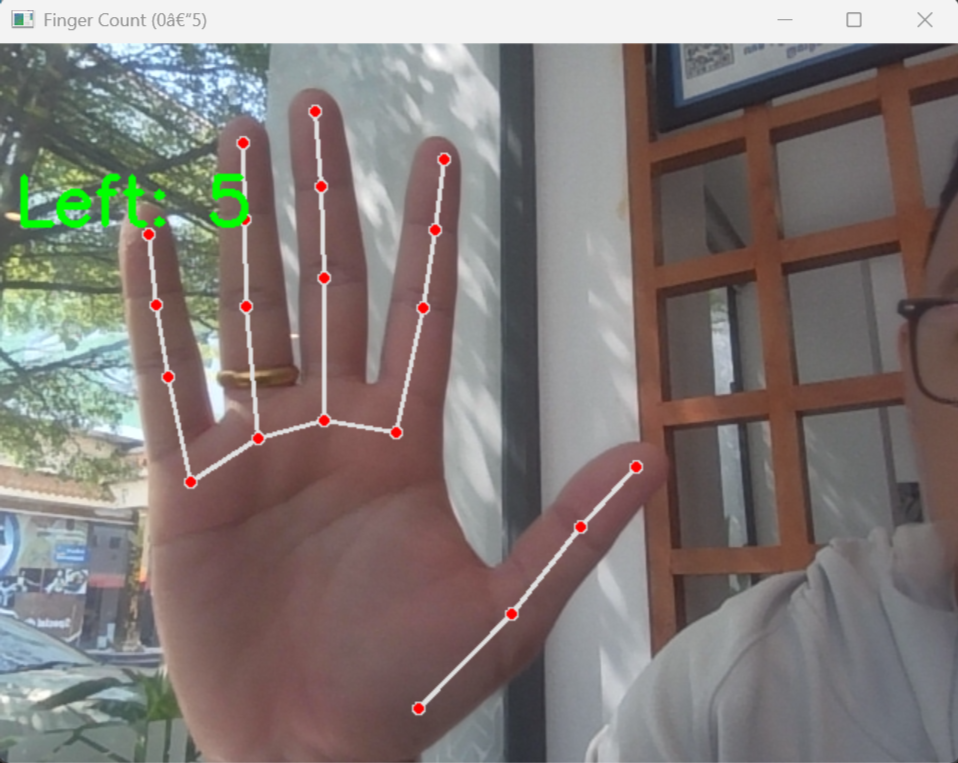
Track key landmarks (finger joints)</li>
  <li>Count how many fingers are raised</li>
  <li>Display the result live on the screen</li>
</ul>

<p>This can be extended into applications such as:</p>

<ul>
  <li>Gesture-based control systems</li>
  <li>Touchless interfaces</li>
  <li>Robotics control using hand gestures</li>
  <li>Interactive installations</li>
</ul>

<hr />

<h2 id="-key-concepts">🧠 Key Concepts</h2>

<p>This project introduces several important ideas:</p>

<h3 id="1-computer-vision">1. Computer Vision</h3>
<p>Using cameras to extract meaningful information from images.</p>

<h3 id="2-landmark-detection">2. Landmark Detection</h3>
<p>MediaPipe identifies <strong>21 key points</strong> on the hand, including fingertips and joints.</p>

<h3 id="3-real-time-processing">3. Real-Time Processing</h3>
<p>Each frame from the camera is processed continuously to give instant feedback.</p>

<h3 id="4-logic-based-finger-counting">4. Logic-Based Finger Counting</h3>
<p>Finger states are determined by comparing landmark positions.</p>

<hr />

<h2 id="️-system-requirements">🛠️ System Requirements</h2>

<h3 id="software">Software</h3>
<ul>
  <li>Python <strong>3.10 or 3.11</strong></li>
  <li>Visual Studio Code (recommended)</li>
  <li>Git (optional but useful)</li>
</ul>

<blockquote>
  <p>⚠️ MediaPipe may not work properly with Python 3.12+</p>
</blockquote>

<h3 id="hardware">Hardware</h3>
<ul>
  <li>Webcam (built-in or external)</li>
  <li>OR IP camera stream</li>
</ul>

<hr />

<h2 id="-project-structure">📂 Project Structure</h2>
<p>Finger_Detection_Assignment/</p>

<div class="language-plaintext highlighter-rouge"><div class="highlight"><pre class="highlight"><code>├── Finger_count.py # Main program
├── README.md # This file
</code></pre></div></div>

<h2 id="create-a-virtual-environment">Create a virtual environment</h2>
<h3 id="windows">Windows</h3>

<div class="language-plaintext highlighter-rouge"><div class="highlight"><pre class="highlight"><code>python3 -m venv myenv
</code></pre></div></div>

<h3 id="macos--linux">macOS / Linux</h3>

<div class="language-plaintext highlighter-rouge"><div class="highlight"><pre class="highlight"><code>python3 -m venv myenv
</code></pre></div></div>

<h2 id="verify-installation">Verify Installation</h2>

<p>Run in the terminal</p>

<div class="language-plaintext highlighter-rouge"><div class="highlight"><pre class="highlight"><code>python3 --version 
</code></pre></div></div>

<p>You should see</p>

<div class="language-plaintext highlighter-rouge"><div class="highlight"><pre class="highlight"><code>Python 3.11.9
</code></pre></div></div>

<h2 id="activate-the-virtual-environment">Activate the virtual environment</h2>

<div class="language-bash highlighter-rouge"><div class="highlight"><pre class="highlight"><code>.<span class="se">\m</span>yenv<span class="se">\S</span>cript<span class="se">\a</span>ctivate
</code></pre></div></div>

<h2 id="install-required-python-libraries">Install Required Python Libraries</h2>
<p>Ensure the virtual environment is activated before installing packages.</p>

<div class="language-bash highlighter-rouge"><div class="highlight"><pre class="highlight"><code>    pip <span class="nb">install </span><span class="nv">mediapipe</span><span class="o">==</span>0.10.11 opencv-python
</code></pre></div></div>
<h2 id="run-the-program">Run the program</h2>
<p>The code for the finger Detection is below:</p>

<div class="language-bash highlighter-rouge"><div class="highlight"><pre class="highlight"><code>import cv2
import mediapipe as mp
import <span class="nb">time

</span>mp_hands <span class="o">=</span> mp.solutions.hands
mp_drawing <span class="o">=</span> mp.solutions.drawing_utils


def count_fingers<span class="o">(</span>hand_landmarks, handedness<span class="o">)</span>:
    <span class="s2">"""
    Return how many fingers are up (0–5).
    handedness: 'Left' or 'Right'
    """</span>
    lm <span class="o">=</span> hand_landmarks.landmark
    fingers_up <span class="o">=</span> 0

    <span class="c"># ---- Thumb ----</span>
    thumb_tip <span class="o">=</span> lm[mp_hands.HandLandmark.THUMB_TIP]
    thumb_ip  <span class="o">=</span> lm[mp_hands.HandLandmark.THUMB_IP]

    <span class="k">if </span>handedness <span class="o">==</span> <span class="s2">"Right"</span>: 
        <span class="k">if </span>thumb_tip.x &lt; thumb_ip.x:
            fingers_up +<span class="o">=</span> 1
    <span class="k">else</span>:  <span class="c"># Left hand</span>
        <span class="k">if </span>thumb_tip.x <span class="o">&gt;</span> thumb_ip.x:
            fingers_up +<span class="o">=</span> 1

    <span class="c"># ---- Other fingers ----</span>
    finger_tips <span class="o">=</span> <span class="o">[</span>
        mp_hands.HandLandmark.INDEX_FINGER_TIP,
        mp_hands.HandLandmark.MIDDLE_FINGER_TIP,
        mp_hands.HandLandmark.RING_FINGER_TIP,
        mp_hands.HandLandmark.PINKY_TIP,
    <span class="o">]</span>
    finger_pips <span class="o">=</span> <span class="o">[</span>
        mp_hands.HandLandmark.INDEX_FINGER_PIP,
        mp_hands.HandLandmark.MIDDLE_FINGER_PIP,
        mp_hands.HandLandmark.RING_FINGER_PIP,
        mp_hands.HandLandmark.PINKY_PIP,
    <span class="o">]</span>

    <span class="k">for </span>tip_id, pip_id <span class="k">in </span>zip<span class="o">(</span>finger_tips, finger_pips<span class="o">)</span>:
        <span class="k">if </span>lm[tip_id].y &lt; lm[pip_id].y:
            fingers_up +<span class="o">=</span> 1

    <span class="k">return </span>fingers_up


def main<span class="o">()</span>:
    cap <span class="o">=</span> cv2.VideoCapture<span class="o">(</span>0<span class="o">)</span>
    cap.set<span class="o">(</span>cv2.CAP_PROP_FRAME_WIDTH, 640<span class="o">)</span>
    cap.set<span class="o">(</span>cv2.CAP_PROP_FRAME_HEIGHT, 480<span class="o">)</span>


    with mp_hands.Hands<span class="o">(</span>
        <span class="nv">max_num_hands</span><span class="o">=</span>2,
        <span class="nv">model_complexity</span><span class="o">=</span>1,
        <span class="nv">min_detection_confidence</span><span class="o">=</span>0.5,
        <span class="nv">min_tracking_confidence</span><span class="o">=</span>0.5
    <span class="o">)</span> as hands:

        <span class="k">while </span>True:
            ret, frame <span class="o">=</span> cap.read<span class="o">()</span>
            <span class="k">if </span>not ret:
                <span class="nb">break

            </span>frame <span class="o">=</span> cv2.flip<span class="o">(</span>frame, 1<span class="o">)</span>
            rgb <span class="o">=</span> cv2.cvtColor<span class="o">(</span>frame, cv2.COLOR_BGR2RGB<span class="o">)</span>
            results <span class="o">=</span> hands.process<span class="o">(</span>rgb<span class="o">)</span>

            <span class="k">if </span>results.multi_hand_landmarks:
                <span class="k">for </span>hand_landmarks, handedness <span class="k">in </span>zip<span class="o">(</span>
                        results.multi_hand_landmarks,
                        results.multi_handedness<span class="o">)</span>:

                    mp_drawing.draw_landmarks<span class="o">(</span>
                        frame,
                        hand_landmarks,
                        mp_hands.HAND_CONNECTIONS
                    <span class="o">)</span>

                    label <span class="o">=</span> handedness.classification[0].label
                    num_fingers <span class="o">=</span> count_fingers<span class="o">(</span>hand_landmarks, label<span class="o">)</span>

                    print<span class="o">(</span>f<span class="s2">"Hand: {label}, Fingers up: {num_fingers}"</span><span class="o">)</span>

                    cv2.putText<span class="o">(</span>
                        frame,
                        f<span class="s2">"{label}: {num_fingers}"</span>,
                        <span class="o">(</span>10, 60 <span class="k">if </span>label <span class="o">==</span> <span class="s2">"Right"</span> <span class="k">else </span>120<span class="o">)</span>,
                        cv2.FONT_HERSHEY_SIMPLEX,
                        1.5,
                        <span class="o">(</span>0, 255, 0<span class="o">)</span>,
                        3
                    <span class="o">)</span>

            cv2.imshow<span class="o">(</span><span class="s2">"Finger Count (0–5)"</span>, frame<span class="o">)</span>

            <span class="k">if </span>cv2.waitKey<span class="o">(</span>1<span class="o">)</span> &amp; 0xFF <span class="o">==</span> ord<span class="o">(</span><span class="s1">'q'</span><span class="o">)</span>:
                <span class="nb">break

    </span>cap.release<span class="o">()</span>
    cv2.destroyAllWindows<span class="o">()</span>


<span class="k">if </span>__name__ <span class="o">==</span> <span class="s2">"__main__"</span>:
    main<span class="o">()</span>


</code></pre></div></div>

<p>Go to the terminal(path to your code) and run:</p>

<div class="language-plaintext highlighter-rouge"><div class="highlight"><pre class="highlight"><code>python3 Finger_count.py
</code></pre></div></div>

<p>And you will see the camera open with the finger-count as below</p>

<p><img src="/images/Finger_count/Finger_2.png" alt="Finger Counter number 2" /></p>

<p><img src="/images/Finger_count/finger_5.png" alt="Finger Counter number 5" /></p>]]></content><author><name>Theara Seng</name><email>t.seng@aupp.edu.kh</email></author><category term="computer vision" /><category term="mediapipe" /><category term="python" /><summary type="html"><![CDATA[🖐️ Finger Detection and Counting using MediaPipe]]></summary></entry><entry><title type="html">YOLOv8 Red &amp;amp; Green Object Detection Analysis</title><link href="https://theara-seng.github.io/posts/2026-01-01-object_detection_analysis" rel="alternate" type="text/html" title="YOLOv8 Red &amp;amp; Green Object Detection Analysis" /><published>2026-01-01T00:00:00+00:00</published><updated>2026-01-01T00:00:00+00:00</updated><id>https://theara-seng.github.io/posts/color_detection_analysis</id><content type="html" xml:base="https://theara-seng.github.io/posts/2026-01-01-object_detection_analysis"><![CDATA[<!-- This post will show up by default. To disable scheduling of future posts, edit `config.yml` and set `future: false`.  -->

<h1 id="yolov8-red--green-object-detection">YOLOv8 Red &amp; Green Object Detection</h1>

<h2 id="-project-overview">📌 Project Overview</h2>
<p>This project uses <strong>YOLOv8</strong> to detect and classify two object classes:</p>

<ul>
  <li>🟩 <code class="language-plaintext highlighter-rouge">greenbox</code></li>
  <li>🟥 <code class="language-plaintext highlighter-rouge">redbox</code></li>
</ul>

<h2 id="️-training-configuration">⚙️ Training Configuration</h2>
<p>After running</p>

<div class="language-plaintext highlighter-rouge"><div class="highlight"><pre class="highlight"><code>yolo detect train model=yolov8n.pt data=data.yaml imgsz=320 epochs=10 batch=16 device=0
</code></pre></div></div>

<table>
  <thead>
    <tr>
      <th>Parameter</th>
      <th>Value</th>
    </tr>
  </thead>
  <tbody>
    <tr>
      <td>Model</td>
      <td>yolov8n</td>
    </tr>
    <tr>
      <td>Image Size</td>
      <td>320</td>
    </tr>
    <tr>
      <td>Epochs</td>
      <td>10</td>
    </tr>
    <tr>
      <td>Batch Size</td>
      <td>16</td>
    </tr>
    <tr>
      <td>Device</td>
      <td>GPU (device=0)</td>
    </tr>
  </tbody>
</table>

<h2 id="-important-output-files">📁 Important Output Files</h2>
<p>Inside the training folder (<code class="language-plaintext highlighter-rouge">runs/detect/train/</code>), the most important files are:</p>

<ul>
  <li><code class="language-plaintext highlighter-rouge">results.png</code> ✅ (main training graph)</li>
  <li><code class="language-plaintext highlighter-rouge">confusion_matrix.png</code> ✅</li>
  <li><code class="language-plaintext highlighter-rouge">PR_curve.png</code> ✅</li>
  <li><code class="language-plaintext highlighter-rouge">F1_curve.png</code> ✅</li>
  <li><code class="language-plaintext highlighter-rouge">weights/best.pt</code> ✅</li>
</ul>

<h2 id="-resultspng-main-graph">📊 results.png (Main Graph)</h2>

<p>Shows:</p>
<ul>
  <li>Training &amp; validation loss</li>
  <li>Precision and recall</li>
  <li>mAP50 and mAP50-95</li>
</ul>

<p>✔ What to check:</p>

<ul>
  <li>Loss decreases over time → model is learning</li>
  <li>Validation follows training → no overfitting</li>
  <li>mAP increases → performance improves</li>
</ul>

<p><img src="/images/color_detection_image/results.png" alt="Result" /></p>

<p>Throught the Graph we can analyze</p>

<h3 id="1-training-loss-analysis">1. TRAINING LOSS ANALYSIS</h3>

<p>🔹  train/box_loss</p>
<ul>
  <li>Decreases from ~0.75 → ~0.53</li>
  <li>
    <p>Smooth and consistent</p>

    <p><strong>Interpretation:</strong></p>
  </li>
  <li>
    <h2 id="model-is-improving-bounding-box-localization">Model is improving bounding box localization</h2>
    <p>🔹  train/cls_loss</p>
  </li>
  <li>Drops rapidly from ~1.4 → ~0.28<br />
<strong>Interpretation:</strong></li>
  <li>Model quickly learns to classify <code class="language-plaintext highlighter-rouge">redbox</code> vs <code class="language-plaintext highlighter-rouge">greenbox</code></li>
  <li>Task is relatively easy (distinct colors)</li>
</ul>

<hr />
<p>🔹  train/dfl_loss</p>
<ul>
  <li>Gradual decrease</li>
</ul>

<p><strong>Interpretation:</strong></p>
<ul>
  <li>Model is refining bounding box precision</li>
</ul>

<hr />

<h3 id="2-validation-loss-analysis">2. Validation Loss Analysis</h3>

<p>🔹  val/box_loss</p>
<ul>
  <li>Smooth decrease</li>
</ul>

<p><strong>Interpretation:</strong></p>
<ul>
  <li>Good generalization to unseen validation data</li>
</ul>

<hr />
<p>🔹   val/cls_loss</p>
<ul>
  <li>Spike at early epoch (~3)</li>
  <li>Then decreases steadily</li>
</ul>

<p><strong>Interpretation:</strong></p>
<ul>
  <li>Early training instability (normal)</li>
  <li>Model stabilizes afterward</li>
</ul>

<hr />

<p>🔹  val/dfl_loss</p>
<ul>
  <li>Smooth decreasing trend</li>
</ul>

<p><strong>Interpretation:</strong></p>
<ul>
  <li>Bounding box quality improves on validation data</li>
</ul>

<hr />
<h4 id="-key-concept-overfitting-check">🚨 Key Concept: Overfitting Check</h4>

<table>
  <thead>
    <tr>
      <th>Training Loss</th>
      <th>Validation Loss</th>
      <th>Meaning</th>
    </tr>
  </thead>
  <tbody>
    <tr>
      <td>↓</td>
      <td>↓</td>
      <td>✅ Good (your case)</td>
    </tr>
    <tr>
      <td>↓</td>
      <td>↑</td>
      <td>❌ Overfitting</td>
    </tr>
    <tr>
      <td>↑</td>
      <td>↑</td>
      <td>❌ Poor training</td>
    </tr>
  </tbody>
</table>

<p><strong>Conclusion:</strong></p>
<ul>
  <li>No overfitting observed</li>
  <li>Model generalizes well</li>
</ul>

<hr />

<h3 id="3-precision-analysis">3. Precision Analysis</h3>

<ul>
  <li>Starts ~0.94</li>
  <li>Drops briefly</li>
  <li>Converges to ~1.0</li>
</ul>

<p><strong>Interpretation:</strong></p>
<ul>
  <li>Very few false positives</li>
  <li>Temporary fluctuation is normal</li>
</ul>

<hr />

<h3 id="4-recall-analysis">4. Recall Analysis</h3>

<ul>
  <li>Similar behavior to precision</li>
  <li>Ends near 1.0</li>
</ul>

<p><strong>Interpretation:</strong></p>
<ul>
  <li>Model detects almost all objects</li>
  <li>Very few missed detections</li>
</ul>

<hr />

<h3 id="-5-map-analysis-most-important-metric">📊 5. mAP Analysis (Most Important Metric)</h3>

<p>🔹  mAP50</p>
<ul>
  <li>Final value ≈ 0.995</li>
</ul>

<p><strong>Interpretation:</strong></p>
<ul>
  <li>Nearly perfect detection at IoU = 0.5</li>
</ul>

<hr />

<p>🔹   mAP50-95</p>
<ul>
  <li>Improves from ~0.81 → ~0.93</li>
</ul>

<p><strong>Interpretation:</strong></p>
<ul>
  <li>Strong performance under stricter evaluation</li>
  <li>Indicates robust bounding box quality</li>
</ul>

<hr />
<h3 id="️-6-early-epoch-instability">⚠️ 6. Early Epoch Instability</h3>

<p>Observed at epoch ~3:</p>
<ul>
  <li>Drop in precision, recall, and mAP</li>
</ul>

<p><strong>Reason:</strong></p>
<ul>
  <li>Random weight initialization</li>
  <li>Learning adjustment phase</li>
</ul>

<p><strong>Important:</strong></p>
<ul>
  <li>This is normal behavior in training</li>
  <li>Focus on overall trend, not individual fluctuations</li>
</ul>

<hr />
<h3 id="-7-trend-vs-raw-values">📉 7. Trend vs Raw Values</h3>

<ul>
  <li>Blue line: actual values</li>
  <li>Orange line: smoothed trend</li>
</ul>

<p><strong>Interpretation:</strong></p>
<ul>
  <li>Smoothed curve shows true learning behavior</li>
  <li>Model trend is stable and improving</li>
</ul>

<hr />

<h2 id="-confusion_matrixpng">📉 confusion_matrix.png</h2>

<p>Shows classification performance:</p>

<table>
  <thead>
    <tr>
      <th>True \ Predicted</th>
      <th>greenbox</th>
      <th>redbox</th>
    </tr>
  </thead>
  <tbody>
    <tr>
      <td>greenbox</td>
      <td>✅ correct</td>
      <td>❌ wrong</td>
    </tr>
    <tr>
      <td>redbox</td>
      <td>❌ wrong</td>
      <td>✅ correct</td>
    </tr>
  </tbody>
</table>

<p><strong>What to check:</strong></p>
<ul>
  <li>Strong diagonal → good model</li>
  <li>Off-diagonal → classification errors</li>
</ul>

<hr />
<p>Below is the confusing matrix we get after the training</p>

<p><img src="/images/color_detection_image/confusion_matrix.png" alt="confusion matrix" /></p>

<h3 id="-correct-predictions-diagonal">✅ Correct Predictions (Diagonal)</h3>

<ul>
  <li>greenbox → greenbox = <strong>573</strong></li>
  <li>redbox → redbox = <strong>427</strong></li>
</ul>

<h3 id="-interpretation">🎯 Interpretation:</h3>
<ul>
  <li>Model correctly classifies almost all objects</li>
  <li>Very strong diagonal → excellent performance</li>
</ul>

<hr />

<h3 id="-errors-off-diagonal">❌ Errors (Off-Diagonal)</h3>

<h4 id="-false-positives-fp">🔹 False Positives (FP)</h4>
<ul>
  <li>1 background detected as redbox</li>
</ul>

<p>👉 Meaning:</p>
<ul>
  <li>Model detected an object where there is none</li>
</ul>

<hr />

<h4 id="-false-negatives-fn">🔹 False Negatives (FN)</h4>
<ul>
  <li>1 greenbox missed (predicted as background)</li>
  <li>1 redbox missed (predicted as background)</li>
</ul>

<p>👉 Meaning:</p>
<ul>
  <li>Model failed to detect some objects</li>
</ul>

<hr />

<h3 id="-error-summary">📊 Error Summary</h3>

<table>
  <thead>
    <tr>
      <th>Error Type</th>
      <th>Count</th>
    </tr>
  </thead>
  <tbody>
    <tr>
      <td>False Positive</td>
      <td>1</td>
    </tr>
    <tr>
      <td>False Negative</td>
      <td>2</td>
    </tr>
  </tbody>
</table>

<p>👉 Total errors = <strong>3 (very low)</strong></p>

<hr />

<h3 id="-performance-interpretation">📈 Performance Interpretation</h3>

<h4 id="-strengths">✅ Strengths</h4>
<ul>
  <li>Nearly perfect classification between red and green</li>
  <li>Almost no confusion between classes</li>
  <li>Extremely high accuracy</li>
</ul>

<hr />

<h2 id="-pr_curvepng-precisionrecall-curve">📈 PR_curve.png (Precision–Recall Curve)</h2>
<p>Shows tradeoff between precision and recall.</p>

<p><strong>What to check:</strong></p>
<ul>
  <li>Curve near top-right → excellent model</li>
  <li>Large area under curve → high performance</li>
</ul>

<hr />
<h3 id="-1-precisionrecall-pr-curve">✅ 1. Precision–Recall (PR) Curve</h3>

<p><strong>Purpose:</strong></p>
<ul>
  <li>Shows overall model performance</li>
  <li>Combines:
    <ul>
      <li>Precision (accuracy)</li>
      <li>Recall (completeness)</li>
    </ul>
  </li>
</ul>

<p><strong>Why important:</strong></p>
<ul>
  <li>Used to compute <strong>mAP (main YOLO metric)</strong></li>
  <li>Best indicator of model quality</li>
</ul>

<p><img src="/images/color_detection_image/BoxPR_curve.png" alt="PR Curve" /></p>

<p><strong>Result:</strong></p>
<ul>
  <li>Curve near <strong>top-right</strong></li>
  <li>mAP ≈ <strong>0.995</strong></li>
</ul>

<p>👉 <strong>Conclusion: Excellent model</strong></p>

<hr />
<h3 id="-2-precisionconfidence-curve-p-curve">📈 2. Precision–Confidence Curve (P Curve)</h3>

<p><strong>Purpose:</strong></p>
<ul>
  <li>Shows how precision changes with confidence threshold</li>
</ul>

<p><strong>Interpretation:</strong></p>
<ul>
  <li>Higher confidence → fewer false positives</li>
  <li>Model becomes more strict</li>
</ul>

<p><img src="/images/color_detection_image/BoxP_curve.png" alt="P Curve" /></p>

<p><strong>Result:</strong></p>
<ul>
  <li>Precision quickly reaches <strong>~1.0</strong></li>
  <li>Very stable</li>
</ul>

<p>👉 <strong>Conclusion: Predictions are highly accurate</strong></p>

<hr />
<h3 id="-3-recallconfidence-curve-r-curve">📉 3. Recall–Confidence Curve (R Curve)</h3>

<p><strong>Purpose:</strong></p>
<ul>
  <li>Shows how many objects are detected as threshold changes</li>
</ul>

<p><strong>Interpretation:</strong></p>
<ul>
  <li>Higher confidence → more missed detections</li>
</ul>

<p><img src="/images/color_detection_image/BoxR_curve.png" alt="R Curve" /></p>

<p><strong>Result:</strong></p>
<ul>
  <li>Recall ≈ <strong>1.0 at low confidence</strong></li>
  <li>Drops sharply after ~0.9</li>
</ul>

<p>👉 <strong>Conclusion: High confidence may miss objects</strong></p>

<hr />

<h3 id="-f1_curvepng">📊 F1_curve.png</h3>
<p>Shows best balance between precision and recall.</p>

<p><strong>What to check:</strong></p>
<ul>
  <li>Peak value → best performance</li>
  <li>Confidence at peak → optimal threshold</li>
</ul>

<p>👉 It represents the <strong>best balance between Precision and Recall</strong></p>

<p><img src="/images/color_detection_image/BoxF1_curve.png" alt="F1 Curve" /></p>

<h3 id="-shape">🔹 Shape:</h3>
<ul>
  <li>F1 is <strong>very high (~1.0)</strong> across a wide range</li>
  <li>Drops sharply after <strong>~0.9 confidence</strong></li>
</ul>

<h3 id="-key-point">🔹 Key point:</h3>
<ul>
  <li><strong>Best F1 ≈ 1.00 at confidence ≈ 0.799</strong></li>
</ul>

<hr />
<h3 id="-1-excellent-performance">✅ 1. Excellent Performance</h3>
<ul>
  <li>F1 ≈ <strong>1.0</strong> → almost perfect balance</li>
  <li>Means:
    <ul>
      <li>Very few false positives</li>
      <li>Very few missed detections</li>
    </ul>
  </li>
</ul>

<p>👉 Model is <strong>extremely strong</strong></p>

<hr />

<h3 id="️-2-optimal-threshold">⚖️ 2. Optimal Threshold</h3>

<ul>
  <li>Best confidence ≈ <strong>0.8</strong></li>
</ul>

<p>👉 This is the <strong>ideal operating point</strong></p>

<p>At this point:</p>
<ul>
  <li>Precision is high</li>
  <li>Recall is high</li>
  <li>Overall performance is maximized</li>
</ul>

<hr />

<h3 id="-weightsbestpt">🧠 weights/best.pt</h3>
<p>The final trained model.</p>

<p>Use it for inference:</p>

<div class="language-bash highlighter-rouge"><div class="highlight"><pre class="highlight"><code>yolo detect predict <span class="nv">model</span><span class="o">=</span>weights/best.pt <span class="nb">source</span><span class="o">=</span>your_image.jpg <span class="nv">conf</span><span class="o">=</span>0.8
</code></pre></div></div>

<h2 id="1-detection-output">1. Detection Output</h2>

<p>For example:</p>

<div class="language-bash highlighter-rouge"><div class="highlight"><pre class="highlight"><code> yolo detect predict <span class="nv">model</span><span class="o">=</span>best.pt <span class="nb">source</span><span class="o">=</span><span class="nb">test</span>/images/greenbox_0_jpg.rf.b7606581a957e3d3d3b8a36e5a4d82cb.jpg <span class="nv">conf</span><span class="o">=</span>0.8
</code></pre></div></div>

<p><img src="/images/color_detection_image/example.png" alt="Detection" /></p>

<h3 id="model-detected">Model detected:</h3>
<ul>
  <li>1 object</li>
  <li>Class = greenbox</li>
  <li>Inference time = 12.8 ms</li>
</ul>]]></content><author><name>Theara Seng</name><email>t.seng@aupp.edu.kh</email></author><category term="cool posts" /><category term="category1" /><category term="category2" /><summary type="html"><![CDATA[]]></summary></entry><entry><title type="html">YOLOv8 Red &amp;amp; Green Object Detection</title><link href="https://theara-seng.github.io/posts/2026-01-01-object_detection" rel="alternate" type="text/html" title="YOLOv8 Red &amp;amp; Green Object Detection" /><published>2026-01-01T00:00:00+00:00</published><updated>2026-01-01T00:00:00+00:00</updated><id>https://theara-seng.github.io/posts/object_detection</id><content type="html" xml:base="https://theara-seng.github.io/posts/2026-01-01-object_detection"><![CDATA[<!-- This post will show up by default. To disable scheduling of future posts, edit `config.yml` and set `future: false`.  -->

<h1 id="yolov8-red--green-object-detection">YOLOv8 Red &amp; Green Object Detection</h1>
<h3 id="raspberry-pi-deployment-guide">Raspberry Pi Deployment Guide</h3>

<p>This project demonstrates how to <strong>train</strong>, <strong>convert</strong>, and <strong>deploy</strong> a YOLOv8 model for <strong>red and green color object detection</strong> using a dataset from <strong>Roboflow</strong>.</p>

<h2 id="️-configuration-overview">⚙️ Configuration Overview</h2>

<table>
  <thead>
    <tr>
      <th>Item</th>
      <th>Description</th>
      <th>Recommended</th>
    </tr>
  </thead>
  <tbody>
    <tr>
      <td><strong>Model Architecture</strong></td>
      <td>YOLOv8n (Nano)</td>
      <td>Lightweight for Raspberry Pi</td>
    </tr>
    <tr>
      <td><strong>Image Size</strong></td>
      <td>320 × 320</td>
      <td>Balance between accuracy and speed</td>
    </tr>
    <tr>
      <td><strong>Batch Size</strong></td>
      <td>16</td>
      <td>Adjust if memory is limited</td>
    </tr>
    <tr>
      <td><strong>Training Epochs</strong></td>
      <td>200</td>
      <td>Stop earlier if loss stabilizes</td>
    </tr>
    <tr>
      <td><strong>Confidence Threshold</strong></td>
      <td>0.4–0.5</td>
      <td>Filter weak detections</td>
    </tr>
    <tr>
      <td><strong>ONNX Opset Version</strong></td>
      <td>12</td>
      <td>Compatible with ONNX Runtime 1.16+</td>
    </tr>
    <tr>
      <td><strong>Raspberry Pi Model</strong></td>
      <td>Pi 4 (2GB to 4GB)</td>
      <td>64-bit OS recommended</td>
    </tr>
    <tr>
      <td><strong>Camera</strong></td>
      <td>USB or CSI camera</td>
      <td>Test with <code class="language-plaintext highlighter-rouge">cv2.VideoCapture(0)</code></td>
    </tr>
    <tr>
      <td><strong>Python Version</strong></td>
      <td>3.10+</td>
      <td>Ensure <code class="language-plaintext highlighter-rouge">venv</code> and <code class="language-plaintext highlighter-rouge">pip</code> installed</td>
    </tr>
  </tbody>
</table>

<h2 id="1-download-dataset-from-roboflow">1. Download Dataset from Roboflow</h2>

<p>You will train the model using a dataset hosted on <strong>Roboflow</strong>.</p>
<ol>
  <li>Open your dataset page on Roboflow:
 👉 <a href="https://universe.roboflow.com/danish-cq5li/wro-detection-47xs2/dataset/1">YOLOv8 Red-Green Detection Dataset</a></li>
  <li>
    <p>Click <strong>Download Dataset → YOLOv8 format</strong><br />
Then extract it inside your project folder.</p>
  </li>
  <li>
    <p>The folder structure should look like this:</p>

    <p>├── train/</p>

    <p>├── valid/</p>

    <p>├── data.yaml</p>
  </li>
  <li>Inside your <code class="language-plaintext highlighter-rouge">data.yaml</code>, confirm that it contains something like this:
    <div class="language-yaml highlighter-rouge"><div class="highlight"><pre class="highlight"><code><span class="na">train</span><span class="pi">:</span> <span class="s">../train/images</span>
<span class="na">val</span><span class="pi">:</span> <span class="s">../valid/images</span>
<span class="na">nc</span><span class="pi">:</span> <span class="m">2</span>
<span class="na">names</span><span class="pi">:</span> <span class="pi">[</span><span class="s1">'</span><span class="s">redbox'</span><span class="pi">,</span> <span class="s1">'</span><span class="s">greenbox'</span><span class="pi">]</span>
</code></pre></div>    </div>
  </li>
</ol>

<h2 id="2-set-up-training-environment-on-windows">2. Set Up Training Environment (on Windows)</h2>
<p>This section explains how to prepare your environment on <strong>Windows</strong> for training YOLOv8.</p>
<ol>
  <li>Open <strong>PowerShell</strong> in your project folder.</li>
  <li>
    <p>Create a new Python virtual environment:
```bash
python -m venv yolo</p>
  </li>
  <li>
    <p>Activate the environment:
 ```bash
 .\yolo\Scripts\activate</p>
  </li>
  <li>
    <p>PyTorch CUDA build (current default index provides CUDA-enabled wheels)
 ```
 pip install –upgrade pip
 pip install torch torchvision torchaudio –index-url https://download.pytorch.org/whl/cu121</p>

    <p># Ultralytics (YOLOv8)
 pip install ultralytics</p>
  </li>
  <li>Verify installation:
    <div class="language-plaintext highlighter-rouge"><div class="highlight"><pre class="highlight"><code>yolo version
## 3. Train the YOLOv8 Model
Train your YOLOv8 model using your Roboflow dataset.
</code></pre></div>    </div>
    <p>yolo detect train model=yolov8n.pt data=data.yaml imgsz=320 epochs=10 batch=16 device=0
```
we use the device=0 to train using GPU. If your laptop doesn’t have the gpu, you can train on google colab</p>
  </li>
</ol>

<p>After training, your weights will be located at:</p>
<div class="language-plaintext highlighter-rouge"><div class="highlight"><pre class="highlight"><code>runs\detect\train\weights\best.pt
</code></pre></div></div>

<h2 id="4-testing-the-model-on-laptop">4. Testing the model on Laptop</h2>
<p>Below code is used for testing model and detection with best.pt on laptop</p>

<div class="language-bash highlighter-rouge"><div class="highlight"><pre class="highlight"><code>from ultralytics import YOLO
import cv2

<span class="c"># --- Load your trained YOLOv8 model ---</span>
model <span class="o">=</span> YOLO<span class="o">(</span><span class="s2">"best.pt"</span><span class="o">)</span>   <span class="c"># make sure best.pt is in the same folder as this script</span>

<span class="c"># --- Open webcam (0 = default cam, or replace with video path or image folder) ---</span>
cap <span class="o">=</span> cv2.VideoCapture<span class="o">(</span>0<span class="o">)</span>   <span class="c"># use 0, 1, or a file path like 'video.mp4'</span>

<span class="k">if </span>not cap.isOpened<span class="o">()</span>:
    print<span class="o">(</span><span class="s2">"Cannot open webcam"</span><span class="o">)</span>
    <span class="nb">exit</span><span class="o">()</span>

print<span class="o">(</span><span class="s2">"✅ Webcam opened successfully. Press 'q' to quit."</span><span class="o">)</span>

<span class="k">while </span>True:
    ret, frame <span class="o">=</span> cap.read<span class="o">()</span>
    <span class="k">if </span>not ret:
        print<span class="o">(</span><span class="s2">"Frame grab failed."</span><span class="o">)</span>
        <span class="nb">break</span>

    <span class="c"># --- Run YOLOv8 inference on the frame ---</span>
    results <span class="o">=</span> model<span class="o">(</span>frame, <span class="nv">stream</span><span class="o">=</span>True<span class="o">)</span>

    <span class="c"># --- Process detections ---</span>
    <span class="k">for </span>r <span class="k">in </span>results:
        boxes <span class="o">=</span> r.boxes
        <span class="k">for </span>box <span class="k">in </span>boxes:
            cls_id <span class="o">=</span> int<span class="o">(</span>box.cls[0]<span class="o">)</span>
            conf <span class="o">=</span> float<span class="o">(</span>box.conf[0]<span class="o">)</span>
            label <span class="o">=</span> model.names[cls_id]

            <span class="c"># Get coordinates</span>
            x1, y1, x2, y2 <span class="o">=</span> map<span class="o">(</span>int, box.xyxy[0]<span class="o">)</span>

            <span class="c"># Draw box and label</span>
            color <span class="o">=</span> <span class="o">(</span>0, 255, 0<span class="o">)</span> <span class="k">if </span>label <span class="o">==</span> <span class="s2">"greenbox"</span> <span class="k">else</span> <span class="o">(</span>0, 0, 255<span class="o">)</span>
            cv2.rectangle<span class="o">(</span>frame, <span class="o">(</span>x1, y1<span class="o">)</span>, <span class="o">(</span>x2, y2<span class="o">)</span>, color, 2<span class="o">)</span>
            cv2.putText<span class="o">(</span>frame, f<span class="s2">"{label} {conf:.2f}"</span>, <span class="o">(</span>x1, y1 - 10<span class="o">)</span>,
                        cv2.FONT_HERSHEY_SIMPLEX, 0.7, color, 2<span class="o">)</span>

            print<span class="o">(</span>f<span class="s2">"Detected: {label} (conf {conf:.2f})"</span><span class="o">)</span>

    <span class="c"># --- Show the result ---</span>
    cv2.imshow<span class="o">(</span><span class="s2">"YOLOv8 Detection"</span>, frame<span class="o">)</span>

    <span class="c"># Exit on 'q'</span>
    <span class="k">if </span>cv2.waitKey<span class="o">(</span>1<span class="o">)</span> &amp; 0xFF <span class="o">==</span> ord<span class="o">(</span><span class="s1">'q'</span><span class="o">)</span>:
        <span class="nb">break

</span>cap.release<span class="o">()</span>
cv2.destroyAllWindows<span class="o">()</span>
</code></pre></div></div>
<h2 id="5-export-model-to-onnx-for-raspberry-pi">5. Export Model to ONNX (For Raspberry pi)</h2>
<div class="language-plaintext highlighter-rouge"><div class="highlight"><pre class="highlight"><code>yolo export model=best.pt format=onnx imgsz=320 opset=12 dynamic=False simplify=False nms=True
</code></pre></div></div>

<h2 id="6-transfer-model-to-raspberry-pi">6. Transfer Model to Raspberry pi</h2>
<div class="language-plaintext highlighter-rouge"><div class="highlight"><pre class="highlight"><code>scp best.onnx aupp@pi-ip:/home/aupp/Documents/
</code></pre></div></div>

<h2 id="7-create-and-activate-virtual-environment">7. Create and activate virtual environment</h2>
<div class="language-plaintext highlighter-rouge"><div class="highlight"><pre class="highlight"><code>python3 -m venv ~/yolo &amp;&amp; source ~/yolo/bin/activate
</code></pre></div></div>

<p>Install Python Package</p>
<div class="language-plaintext highlighter-rouge"><div class="highlight"><pre class="highlight"><code>pip install --upgrade pip
pip install "numpy==1.23.5" onnxruntime==1.16.3 flask==3.0.0 opencv-python-headless==4.9.0.80
</code></pre></div></div>

<h2 id="8-testing-onnx-on-the-webstream-with-raspberry-pi">8. Testing ONNX on The webstream with Raspberry pi</h2>
<p>The code below is used for testing the model of the red-green detection with rapberry pi</p>

<div class="language-bash highlighter-rouge"><div class="highlight"><pre class="highlight"><code><span class="c">#!/usr/bin/env python3</span>
import os, <span class="nb">time</span>, cv2
from threading import Thread, Lock
from flask import Flask, Response, jsonify, make_response
from ultralytics import YOLO

<span class="c"># -------- config --------</span>
MODEL_PATH <span class="o">=</span> <span class="s2">"onnx_path"</span>   <span class="c"># put best.onnx next to this app.py</span>
CAM_INDEX  <span class="o">=</span> 0
IMG_SIZE   <span class="o">=</span> 320

CONF       <span class="o">=</span> 0.5

<span class="c"># -------- model --------</span>
model <span class="o">=</span> YOLO<span class="o">(</span>MODEL_PATH<span class="o">)</span>

<span class="c"># -------- camera thread --------</span>
class Camera:
    def __init__<span class="o">(</span>self, <span class="nv">index</span><span class="o">=</span>0, <span class="nv">width</span><span class="o">=</span>None, <span class="nv">height</span><span class="o">=</span>None<span class="o">)</span>:
        self.cap <span class="o">=</span> cv2.VideoCapture<span class="o">(</span>index<span class="o">)</span>
        <span class="k">if </span>width:  self.cap.set<span class="o">(</span>cv2.CAP_PROP_FRAME_WIDTH,  width<span class="o">)</span>
        <span class="k">if </span>height: self.cap.set<span class="o">(</span>cv2.CAP_PROP_FRAME_HEIGHT, height<span class="o">)</span>
        self.ok, self.frame <span class="o">=</span> self.cap.read<span class="o">()</span>
        self.lock <span class="o">=</span> Lock<span class="o">()</span>
        self.running <span class="o">=</span> True
        self.t <span class="o">=</span> Thread<span class="o">(</span><span class="nv">target</span><span class="o">=</span>self.update, <span class="nv">daemon</span><span class="o">=</span>True<span class="o">)</span>
        self.t.start<span class="o">()</span>

    def update<span class="o">(</span>self<span class="o">)</span>:
        <span class="k">while </span>self.running:
            ok, f <span class="o">=</span> self.cap.read<span class="o">()</span>
            <span class="k">if </span>ok:
                with self.lock:
                    self.ok, self.frame <span class="o">=</span> ok, f
            <span class="k">else</span>:
                time.sleep<span class="o">(</span>0.01<span class="o">)</span>

    def <span class="nb">read</span><span class="o">(</span>self<span class="o">)</span>:
        with self.lock:
            <span class="k">return </span>self.ok, None <span class="k">if </span>self.frame is None <span class="k">else </span>self.frame.copy<span class="o">()</span>

    def release<span class="o">(</span>self<span class="o">)</span>:
        self.running <span class="o">=</span> False
        time.sleep<span class="o">(</span>0.05<span class="o">)</span>
        self.cap.release<span class="o">()</span>

cam <span class="o">=</span> Camera<span class="o">(</span>CAM_INDEX<span class="o">)</span>

<span class="c"># -------- flask --------</span>
app <span class="o">=</span> Flask<span class="o">(</span>__name__<span class="o">)</span>

INDEX_HTML <span class="o">=</span> <span class="s2">"""&lt;!doctype html&gt;
&lt;html lang="</span>en<span class="s2">"&gt;
&lt;head&gt;
  &lt;meta charset="</span>utf-8<span class="s2">"&gt;
  &lt;title&gt;YOLOv8 ONNX - Raspberry Pi Stream&lt;/title&gt;
  &lt;meta name="</span>viewport<span class="s2">" content="</span><span class="nv">width</span><span class="o">=</span>device-width,initial-scale<span class="o">=</span>1<span class="s2">"&gt;
  &lt;style&gt;
    :root { color-scheme: light dark; }
    body { margin:0; min-height:100vh; display:grid; place-items:center;
           background:#0b0c10; color:#eaf0f6; font-family:system-ui,Segoe UI,Roboto,sans-serif; }
    .card { width:min(96vw,900px); background:#111417; border-radius:16px; padding:14px;
            border:1px solid rgba(255,255,255,0.08); box-shadow:0 10px 40px rgba(0,0,0,.35); }
    h1 { margin:6px 0 10px; font-size:1.05rem; }
    .row { display:flex; gap:10px; justify-content:space-between; align-items:center; }
    .btn { border:1px solid rgba(255,255,255,.12); background:#1b2229; color:#eaf0f6;
           padding:6px 12px; border-radius:10px; cursor:pointer; font-weight:600; }
    .btn:hover { background:#222b33; }
    .frame { width:100%; aspect-ratio:16/9; background:#0d1117; border-radius:12px; overflow:hidden;
             border:1px solid rgba(255,255,255,0.08); display:grid; place-items:center; }
    img { width:100%; height:100%; object-fit:contain; }
    small { opacity:.65; }
  &lt;/style&gt;
&lt;/head&gt;
&lt;body&gt;
  &lt;div class="</span>card<span class="s2">"&gt;
    &lt;div class="</span>row<span class="s2">"&gt;
      &lt;h1&gt;Raspberry Pi • YOLOv8 (ONNX) Live&lt;/h1&gt;
      &lt;button class="</span>btn<span class="s2">" onclick="</span>reloadStream<span class="o">()</span><span class="s2">"&gt;Reload&lt;/button&gt;
    &lt;/div&gt;
    &lt;div class="</span>frame<span class="s2">"&gt;
      &lt;img id="</span>stream<span class="s2">" src="</span>/stream<span class="s2">" alt="</span>Stream<span class="s2">"&gt;
    &lt;/div&gt;
    &lt;div class="</span>row<span class="s2">" style="</span>margin-top:8px<span class="p">;</span><span class="s2">"&gt;
      &lt;small&gt;Status: &lt;span id="</span>health<span class="s2">"&gt;checking…&lt;/span&gt;&lt;/small&gt;
      &lt;small&gt;URL: &lt;code id="</span>url<span class="s2">"&gt;&lt;/code&gt;&lt;/small&gt;
    &lt;/div&gt;
  &lt;/div&gt;
&lt;script&gt;
  async function checkHealth() {
    try {
      const r = await fetch('/health', {cache:'no-store'});
      const j = await r.json();
      document.getElementById('health').textContent = j.camera_ok ? 'camera OK' : 'no camera';
    } catch (e) {
      document.getElementById('health').textContent = 'server offline';
    }
  }
  function reloadStream() {
    const img = document.getElementById('stream');
    img.src = '/stream?ts=' + Date.now();
  }
  document.getElementById('url').textContent = location.href;
  checkHealth(); setInterval(checkHealth, 4000);
&lt;/script&gt;
&lt;/body&gt;&lt;/html&gt;
"""</span>

@app.route<span class="o">(</span><span class="s2">"/"</span><span class="o">)</span>
def index<span class="o">()</span>:
    <span class="k">return </span>make_response<span class="o">(</span>INDEX_HTML, 200<span class="o">)</span>

@app.route<span class="o">(</span><span class="s2">"/health"</span><span class="o">)</span>
def health<span class="o">()</span>:
    ok, _ <span class="o">=</span> cam.read<span class="o">()</span>
    <span class="k">return </span>jsonify<span class="o">({</span><span class="s2">"camera_ok"</span>: bool<span class="o">(</span>ok<span class="o">)})</span>

def gen_mjpeg<span class="o">()</span>:
    <span class="k">while </span>True:
        ok, frame <span class="o">=</span> cam.read<span class="o">()</span>
        <span class="k">if </span>not ok or frame is None:
            time.sleep<span class="o">(</span>0.02<span class="o">)</span>
            <span class="k">continue
        </span>results <span class="o">=</span> model.predict<span class="o">(</span>frame, <span class="nv">imgsz</span><span class="o">=</span>IMG_SIZE, <span class="nv">conf</span><span class="o">=</span>CONF, <span class="nv">verbose</span><span class="o">=</span>False<span class="o">)</span>
        annotated <span class="o">=</span> results[0].plot<span class="o">()</span>
        <span class="c"># optional resize to cut bandwidth/CPU:</span>
        <span class="c"># annotated = cv2.resize(annotated, (640, 360))</span>
        ok, jpg <span class="o">=</span> cv2.imencode<span class="o">(</span><span class="s2">".jpg"</span>, annotated, <span class="o">[</span>cv2.IMWRITE_JPEG_QUALITY, 80]<span class="o">)</span>
        <span class="k">if </span>not ok:
            <span class="k">continue
        </span>b <span class="o">=</span> jpg.tobytes<span class="o">()</span>
        yield <span class="o">(</span>b<span class="s2">"--frame</span><span class="se">\r\n</span><span class="s2">"</span>
               b<span class="s2">"Content-Type: image/jpeg</span><span class="se">\r\n</span><span class="s2">"</span>
               b<span class="s2">"Cache-Control: no-cache</span><span class="se">\r\n</span><span class="s2">"</span>
               b<span class="s2">"Content-Length: "</span> + str<span class="o">(</span>len<span class="o">(</span>b<span class="o">))</span>.encode<span class="o">()</span> + b<span class="s2">"</span><span class="se">\r\n\r\n</span><span class="s2">"</span> + b + b<span class="s2">"</span><span class="se">\r\n</span><span class="s2">"</span><span class="o">)</span>

@app.route<span class="o">(</span><span class="s2">"/stream"</span><span class="o">)</span>
def stream<span class="o">()</span>:
    <span class="k">return </span>Response<span class="o">(</span>gen_mjpeg<span class="o">()</span>, <span class="nv">mimetype</span><span class="o">=</span><span class="s2">"multipart/x-mixed-replace; boundary=frame"</span><span class="o">)</span>

<span class="k">if </span>__name__ <span class="o">==</span> <span class="s2">"__main__"</span>:
    try:
        app.run<span class="o">(</span><span class="nv">host</span><span class="o">=</span><span class="s2">"0.0.0.0"</span>, <span class="nv">port</span><span class="o">=</span>5000, <span class="nv">threaded</span><span class="o">=</span>True<span class="o">)</span>
    finally:
        cam.release<span class="o">()</span>

</code></pre></div></div>

<p>After that You will see the output as shown in the image below</p>

<p>-&gt; Red Detection</p>

<p><img src="/Slides/robotics/image/red.png" alt="Red Detection" /></p>

<p>-&gt; Green Detection</p>

<p><img src="/Slides/robotics/image//green.png" alt="Green Detection" /></p>]]></content><author><name>Theara Seng</name><email>t.seng@aupp.edu.kh</email></author><category term="cool posts" /><category term="category1" /><category term="category2" /><summary type="html"><![CDATA[]]></summary></entry></feed>